
Projetor beams


Thread Starter
|
Junior Member
Joined: Sep 2007
Posts: 9
From: United States
[img]smileys/smiley5.gif[/img]
Hello.I'm trying to figure out how the headlights on this car can be modified.I was given a link to projector beams(h.i.d.planet)..with hopes of reading about it.I can't seem to find exactly what(I think)i need.Any help on this would be appreciated.To the guy who helped me out on the tailights..You so rock!!!The new tailights should be done soon.I'm building my fiberglass box first..lol(pics of everything to come)[img]smileys/smiley10.gif[/img]

Member
Joined: Sep 2007
Posts: 90
From: United States
<table align="center" border="0" cellpadding="3" cellspacing="1" width="90%"><t><tr><td></span></td> </tr> <tr> <td class="quote">what kit did you use?</td> </tr></t></table>
first one on this page.
http://www.hidplanet.com/package.html
Items Needed:</span></span>

Dremel tool with a bunch of cut off wheels
Foil tape: found in the ducting department at home depot
1-2 things of 5 min epoxy: autozone, advance auto etc.
2 pipe flanges or equivalent: plumbing department at home depot.
RTV
first start off my taking your dremel tool and getting out as much glue
on the housing as you can. it is much easier to get them apart with
less glue.
Preheat oven to ~300 degrees Fahrenheit
let headlight sit in there for about 5-7 min.
after u take it out *CAUTION IT WILL BE HOT*</span> take a flat head screwdriver and pry the headlight apart. parts probably will break i know it did on mine but no big deal.

now with it apart take your dremel and make a hole big enough for your projector to fit in.


NOTE:</span></span>
depending on the size of your HID projectors, on the second gen coups u may have to get rid of the balancer on your headlight.

i had to get rid of it because my BMW projectors are big, if u get valeo projectors they are a little smaller i believe.
after you get the hole big enough, now u have to take it out and
test fit in in the car. again depending on the projectors you may have
to do some cutting to the mounts and/or the projectors them selves. i
had to cut the headlight mounts a little and some on the projector for
them to fit.
NOTE:</span></span> there may be a space between the projector and the headlight as you can see here.

for not do not worry about it, we will take care of that later.
Also Note:</span></span>
so u dont make the same mistake i did and put the projectors in upside
down; if you want your cut off to look like this ___/---- which is what
u want. then u have to mount them so that the shield in the projector
is like this ---\___ because the lens will flip it when it is
projected. shine a flashlight into the projector to make sure u have it
right.
after you get that done now take your pipe flanges and start
cutting them. the purpose of these are to cover the projector (shroud)
so no light escapes and to make it look good. this part is really up to
you on how you want to cut it and have it fit. i cut mine so that they
go over the glass in the projector and not the whole thing.
here is how it looks unfinished on the car with the shroud on.

now for the foil tape. remember the space on the back where the
projector meets the headlight housing? well basically just cover that
space as best as u can with that tape so no light leaks out. do the
same on the inside of the headlight, cover up the projector so no light
leaks out. i wrapped the tape around the projector and made a shroud
with the tape as you can kinda see here.

after you have cut, fitted and test fitted BOTH headlights then it
is time to start putting the epoxy on. basically just put it anywhere
you can so that the projector will stay in place. let dry.
ALSO DO NOT PUT ON THE HEADLIGHT LENS JUST YET U MIGHT HAVE TO
ADJUST THE PROJECTORS LATER. ONLY DO THAT PART WHEN YOU ARE DONE WITH
EVERYTHING AND THE PROJECTORS ARE ALIGNED PROPERLY . MORE ON THAT TO
COME.
so now that everything is dry and solid now we can start the wiring.
if you are good at wiring here is how you should make your harness:
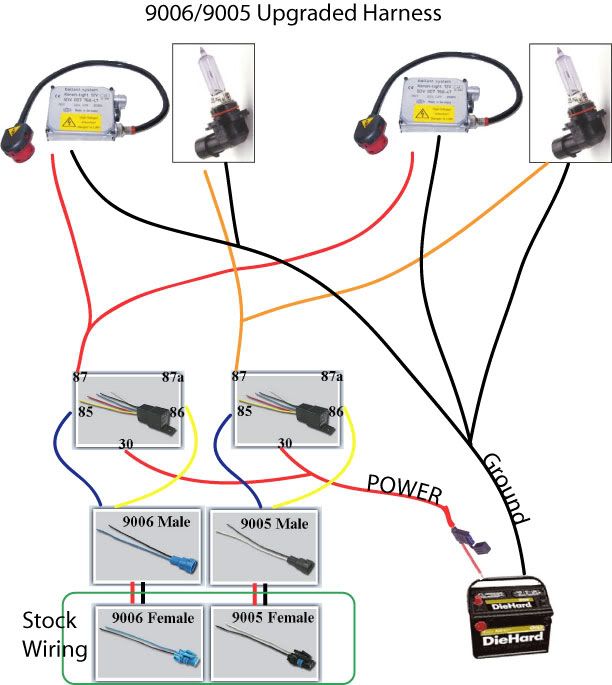
the reason you need a separate harness for HID's and not just cut
the wires from ur stock bulbs is because your car's wires are designed
to handle the stock halogens at ~55w. that's about 4.5 amps running
through them for the stock bulbs. when HID ballasts startup, they can
easily pull 10-12 amps of current which can quickly fry the stock
wiring of the car. using a relay with bigger wire prevents that, plus
allows a better path for power to your lights so they perform better
and aren't restricted by the stock wires. the stock wires will only
provide a signal to the relay which is around .02 amps that's needed
for the coil of the relay. the high current needed for the ballast run
through the contacts of the relay which are usually rated for 30amps.
use at least 14ga wire for the power and grounds for the ballasts and
18ga is fine for the coil signal wires.
if you are like me and suck at wiring u can have someone make one for u. the guy that i had make one, his email address is profuse007@yahoo.com it was $30 shipped i believe and it is really nice.

he provides instructions and everything.
next is your ballasts:

first put the lights in the projectors and hook up the ballast to
them to check if they fit (not hitting any part of the car). if they do
not fit take any steps to make them fit. mine fit just fine but one is
really close to the radiator it kinda worries me.
once they fit take them off and find a place to mount your ballasts. here is where i mounded mine.
passenger side:

drivers side:

find a place where they will not get wet from rain.
next find a place to mount your relay, i mounted mine on the strut tower.

now we can start the wiring.
Wiring:</span></span>
first i want to start off by telling you that the ballast are not marked + -. if you have the kit i have here is how they are.

i would mark them if i were you just in case.
take off the neg. terminal on the battery. next hook up the wire
that powers the harness to the + side of the battery. next take your
stock 9006 pigtail and tap into it and connect that to the harness.
Note:</span></span>
you only need to tap into one 9006 pigtail with the harness that i have.

Also Note:</span></span> polarity is not bias on the pig tail so it dont matter what way u have them.
find a place to ground the ballasts to the chassis and then hook
them up to the harness. now you are ready to turn them on yay!!!!!
Aiming your Projectors:</span></span>
now that u have them wired, mounted CORRECTLY!!! and they work now
u have to aim them correctly so u dont go and blind people in other
cars they are freakin bright.
To Aim Correctly:</span></span>
use this picture
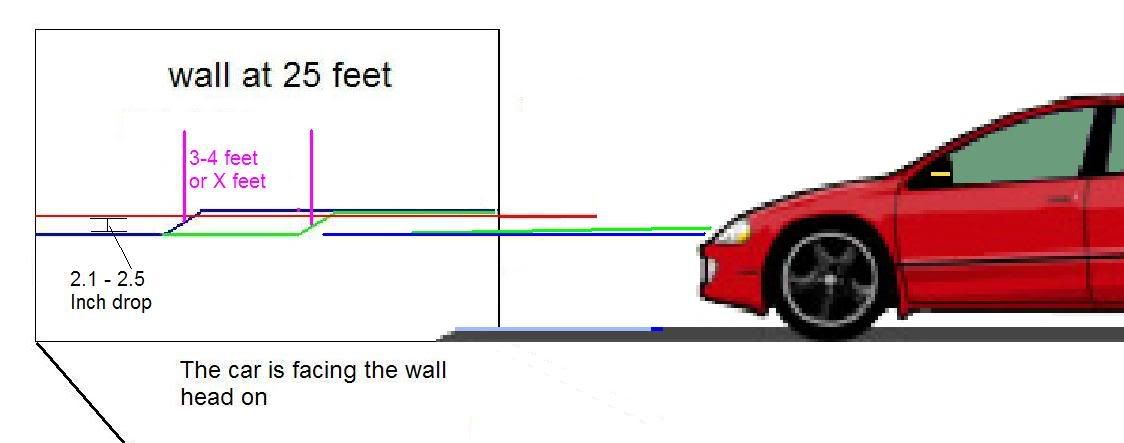
the stock saturn lamps raise and lower plus tilt forward and backwards.
after some tweaking here is how mine look.


i still think it might be a little to high though. also looking at
the pics again they still might need to be adjusted a little they are
not quite even.
another tip for aiming them, when u are driving and the cut off it
above the side mirrors on a car 15-20ft in front of u, u have them too
high and are blinding them. the cut off should not be much higher than
the rear bumper of the car in front of u
just put the headlight back together and your now done, you are now
cool cause u have true HID's. now go pick up some girls with them
here are 2 pics of how they look on the car


and finally with the covers back on

any questions/comments feel free to ask and i shall answer
FAQ:</span></span>
</span><table align="center" border="0" cellpadding="3" cellspacing="1" width="90%"><t><tr> <td></span></td> </tr> <tr> <td class="quote">So you used tin foil and a can? There is really nothing else that could have been used?</td> </tr></t></table>
yes the real way would be to buy a real HID shroud and make that fit
but they are $100 which i didnt want to spend, the can is all i had at
my disposal in 12:30 last night plus its cheap and who does not have a
beer can lying around somewhere. no light gets out and thats all that
matters. i have heard of people using PVC piping also.
the foil tape is mainly used to cover up the space at the back of
the headlight where the headlight and projector meet. i used a little
on the inside of the headlight just to cover up some of the holes where
light was leaking my second time around.
</span><table align="center" border="0" cellpadding="3" cellspacing="1" width="90%"><t><tr> <td></span></td> </tr> <tr> <td class="quote">Maybe
I was just scared about breaking mine, but I absolutely could not get
it open. You got any more details on that? Prying points?</td> </tr></t></table>
really it was so much easier if u use a but off wheel and get a lot of
the glue out b4 u heat it up. i tried it both ways, one with getting
out the glue and the other without doing anything and the one with all
the glue was close to impossible to get lose so i went and got the glue
out of that one and it came off easier. i also took the cut off wheel
and under the headlight i cut off the little "flap" where the cover
goes under and where the glue is. i did this cause when i was trying to
pry it apart it was breaking anyway but that also made it easier to get
apart when i took off that part. just make sure it is sealed good when
u are done.
</span><table align="center" border="0" cellpadding="3" cellspacing="1" width="90%"><t><tr> <td></span></td> </tr> <tr> <td class="quote">tell me more why your using the metal tape. it looked better befor apply it imo. which is why i'm asking.</td> </tr></t></table>
because the projector of not enclosed in anything so light will
escape. covering the projector with the tape will prevent the light
from leaking out and having it look bad plus u will lose usable light.
they sell projector shrouds but they are $100 for decent ones.
here is what a projector looks like:

see where all the light escapes that is what you are trying to
cover up. i wrapped it with the tape but when u put the projectors in
the headlight holes you cut it will most likley rip in some places
which is y i did what i did.
this is the best i can do....hope this helps
</span>
first one on this page.
http://www.hidplanet.com/package.html
Items Needed:</span></span>
Dremel tool with a bunch of cut off wheels
Foil tape: found in the ducting department at home depot
1-2 things of 5 min epoxy: autozone, advance auto etc.
2 pipe flanges or equivalent: plumbing department at home depot.
RTV
first start off my taking your dremel tool and getting out as much glue
on the housing as you can. it is much easier to get them apart with
less glue.
Preheat oven to ~300 degrees Fahrenheit
let headlight sit in there for about 5-7 min.
after u take it out *CAUTION IT WILL BE HOT*</span> take a flat head screwdriver and pry the headlight apart. parts probably will break i know it did on mine but no big deal.
now with it apart take your dremel and make a hole big enough for your projector to fit in.
NOTE:</span></span>
depending on the size of your HID projectors, on the second gen coups u may have to get rid of the balancer on your headlight.
i had to get rid of it because my BMW projectors are big, if u get valeo projectors they are a little smaller i believe.
after you get the hole big enough, now u have to take it out and
test fit in in the car. again depending on the projectors you may have
to do some cutting to the mounts and/or the projectors them selves. i
had to cut the headlight mounts a little and some on the projector for
them to fit.
NOTE:</span></span> there may be a space between the projector and the headlight as you can see here.
for not do not worry about it, we will take care of that later.
Also Note:</span></span>
so u dont make the same mistake i did and put the projectors in upside
down; if you want your cut off to look like this ___/---- which is what
u want. then u have to mount them so that the shield in the projector
is like this ---\___ because the lens will flip it when it is
projected. shine a flashlight into the projector to make sure u have it
right.
after you get that done now take your pipe flanges and start
cutting them. the purpose of these are to cover the projector (shroud)
so no light escapes and to make it look good. this part is really up to
you on how you want to cut it and have it fit. i cut mine so that they
go over the glass in the projector and not the whole thing.
here is how it looks unfinished on the car with the shroud on.
now for the foil tape. remember the space on the back where the
projector meets the headlight housing? well basically just cover that
space as best as u can with that tape so no light leaks out. do the
same on the inside of the headlight, cover up the projector so no light
leaks out. i wrapped the tape around the projector and made a shroud
with the tape as you can kinda see here.
after you have cut, fitted and test fitted BOTH headlights then it
is time to start putting the epoxy on. basically just put it anywhere
you can so that the projector will stay in place. let dry.
ALSO DO NOT PUT ON THE HEADLIGHT LENS JUST YET U MIGHT HAVE TO
ADJUST THE PROJECTORS LATER. ONLY DO THAT PART WHEN YOU ARE DONE WITH
EVERYTHING AND THE PROJECTORS ARE ALIGNED PROPERLY . MORE ON THAT TO
COME.
so now that everything is dry and solid now we can start the wiring.
if you are good at wiring here is how you should make your harness:
the reason you need a separate harness for HID's and not just cut
the wires from ur stock bulbs is because your car's wires are designed
to handle the stock halogens at ~55w. that's about 4.5 amps running
through them for the stock bulbs. when HID ballasts startup, they can
easily pull 10-12 amps of current which can quickly fry the stock
wiring of the car. using a relay with bigger wire prevents that, plus
allows a better path for power to your lights so they perform better
and aren't restricted by the stock wires. the stock wires will only
provide a signal to the relay which is around .02 amps that's needed
for the coil of the relay. the high current needed for the ballast run
through the contacts of the relay which are usually rated for 30amps.
use at least 14ga wire for the power and grounds for the ballasts and
18ga is fine for the coil signal wires.
if you are like me and suck at wiring u can have someone make one for u. the guy that i had make one, his email address is profuse007@yahoo.com it was $30 shipped i believe and it is really nice.
he provides instructions and everything.
next is your ballasts:
first put the lights in the projectors and hook up the ballast to
them to check if they fit (not hitting any part of the car). if they do
not fit take any steps to make them fit. mine fit just fine but one is
really close to the radiator it kinda worries me.
once they fit take them off and find a place to mount your ballasts. here is where i mounded mine.
passenger side:
drivers side:
find a place where they will not get wet from rain.
next find a place to mount your relay, i mounted mine on the strut tower.
now we can start the wiring.
Wiring:</span></span>
first i want to start off by telling you that the ballast are not marked + -. if you have the kit i have here is how they are.
i would mark them if i were you just in case.
take off the neg. terminal on the battery. next hook up the wire
that powers the harness to the + side of the battery. next take your
stock 9006 pigtail and tap into it and connect that to the harness.
Note:</span></span>
you only need to tap into one 9006 pigtail with the harness that i have.
Also Note:</span></span> polarity is not bias on the pig tail so it dont matter what way u have them.
find a place to ground the ballasts to the chassis and then hook
them up to the harness. now you are ready to turn them on yay!!!!!
Aiming your Projectors:</span></span>
now that u have them wired, mounted CORRECTLY!!! and they work now
u have to aim them correctly so u dont go and blind people in other
cars they are freakin bright.
To Aim Correctly:</span></span>
use this picture
the stock saturn lamps raise and lower plus tilt forward and backwards.
after some tweaking here is how mine look.
i still think it might be a little to high though. also looking at
the pics again they still might need to be adjusted a little they are
not quite even.
another tip for aiming them, when u are driving and the cut off it
above the side mirrors on a car 15-20ft in front of u, u have them too
high and are blinding them. the cut off should not be much higher than
the rear bumper of the car in front of u
just put the headlight back together and your now done, you are now
cool cause u have true HID's. now go pick up some girls with them
here are 2 pics of how they look on the car
and finally with the covers back on
any questions/comments feel free to ask and i shall answer
FAQ:</span></span>
</span><table align="center" border="0" cellpadding="3" cellspacing="1" width="90%"><t><tr> <td></span></td> </tr> <tr> <td class="quote">So you used tin foil and a can? There is really nothing else that could have been used?</td> </tr></t></table>
yes the real way would be to buy a real HID shroud and make that fit
but they are $100 which i didnt want to spend, the can is all i had at
my disposal in 12:30 last night plus its cheap and who does not have a
beer can lying around somewhere. no light gets out and thats all that
matters. i have heard of people using PVC piping also.
the foil tape is mainly used to cover up the space at the back of
the headlight where the headlight and projector meet. i used a little
on the inside of the headlight just to cover up some of the holes where
light was leaking my second time around.
</span><table align="center" border="0" cellpadding="3" cellspacing="1" width="90%"><t><tr> <td></span></td> </tr> <tr> <td class="quote">Maybe
I was just scared about breaking mine, but I absolutely could not get
it open. You got any more details on that? Prying points?</td> </tr></t></table>
really it was so much easier if u use a but off wheel and get a lot of
the glue out b4 u heat it up. i tried it both ways, one with getting
out the glue and the other without doing anything and the one with all
the glue was close to impossible to get lose so i went and got the glue
out of that one and it came off easier. i also took the cut off wheel
and under the headlight i cut off the little "flap" where the cover
goes under and where the glue is. i did this cause when i was trying to
pry it apart it was breaking anyway but that also made it easier to get
apart when i took off that part. just make sure it is sealed good when
u are done.
</span><table align="center" border="0" cellpadding="3" cellspacing="1" width="90%"><t><tr> <td></span></td> </tr> <tr> <td class="quote">tell me more why your using the metal tape. it looked better befor apply it imo. which is why i'm asking.</td> </tr></t></table>
because the projector of not enclosed in anything so light will
escape. covering the projector with the tape will prevent the light
from leaking out and having it look bad plus u will lose usable light.
they sell projector shrouds but they are $100 for decent ones.
here is what a projector looks like:
see where all the light escapes that is what you are trying to
cover up. i wrapped it with the tape but when u put the projectors in
the headlight holes you cut it will most likley rip in some places
which is y i did what i did.
this is the best i can do....hope this helps
</span>

Thread
Thread Starter
Forum
Replies
Last Post