When you click on links to various merchants on this site and make a purchase, this can result in this site earning a commission. Affiliate programs and affiliations include, but are not limited to, the eBay Partner Network.
Hello all. Im just looking for some thoughts on the cause of the sounds coming from my engine. I was going to take it in to a shop soon, but wanted to look into it some first.
A noise started in the engine (i think its the engine) some... 6-12 months ago. I forget percisly. It started as a higher pitched pinging noise. I could tell it apart since i was used to my engine sound. Others had a harder time. But the noise was in rythem with the engine.
This video was about 6-7 months ago. Its off my cell phone so quality isnt the greatest. But i was trying to capture the sound. (Nothing rly to visually see.)
One person suggested trying to add some lucas oil stabilizer during my next oil change. Might thicken the oil up a little bit and help. (Something like that.) - I did that during my last oil change. But i hadnt noticed any difference in sound form that specifically.
Others have suggested an issue with a piston or a valve. The sound is in rythem wit the engine. And the sound will speed up and slow down as you accelerate/decelerate.
This is the sound today. I took the vid off my cell phone again. Taken right after starting up the car.
That one is just about to come apart, they are much cheaper to repair before they bend all the valves.
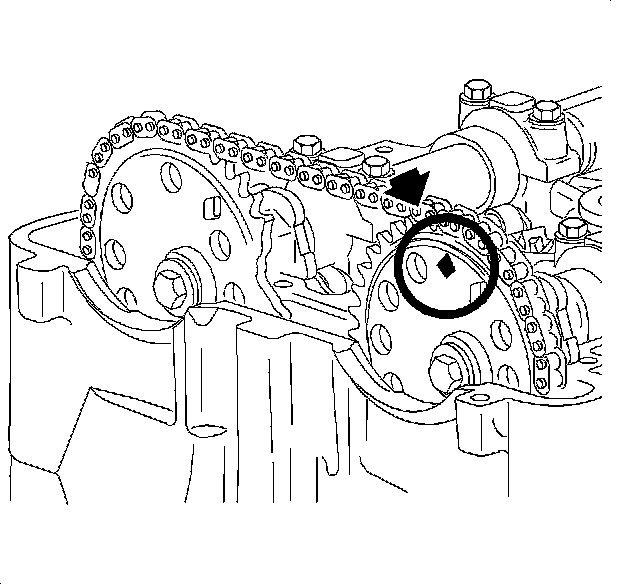
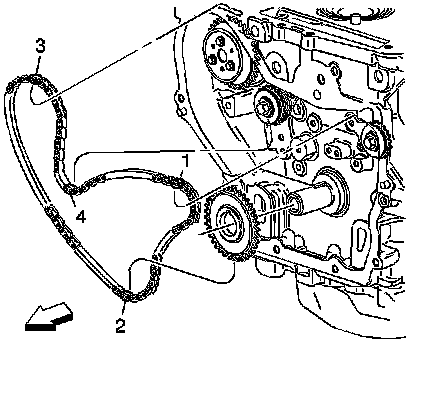
Quit driving it until you can get someone to look under that valve cover. Look at the timing chain, specifically the guide between the gears. Is the brown plastic part gone? In other words is that guide only steel?
I just repaired one for my granddaughter that broke the chain. It bent 6 intakes and four exhausts. It is much easier and less costly to replace the chains and guides before they break. I always use Cloyes chain kits and Felpro gaskets,
That one is just about to come apart, they are much cheaper to repair before they bend all the valves.
What is about to come apart? The chain you mentioned later?
Originally Posted by 02 LW300
Quit driving it until you can get someone to look under that valve cover. Look at the timing chain, specifically the guide between the gears. Is the brown plastic part gone? In other words is that guide only steel?
Im hoping my next drive is to the shop. We shall see if life cooperates.
I dont suppose removing the valve cover is something i can do at home; just to get a look? (not even sure what part that is. The metal top piece maybe? Not my area of expertise.)
Originally Posted by 02 LW300
I just repaired one for my granddaughter that broke the chain. It bent 6 intakes and four exhausts. It is much easier and less costly to replace the chains and guides before they break. I always use Cloyes chain kits and Felpro gaskets,
Iv never seen a chain in the engine before (didnt grow up around that kind of stuff.) But i do recall hearing several ppl over the years mentioning then snapping and damaging things they hit in there. So i dont doubt that it would be better to find out before anything bad happens.
When a timing chain or belt breaks, the timing of the piston movements relative to opening and closing of valves at the top of the cylinders is no longer fixed. For most engines, this means the pistons will likely hit and bend valves that are in their path of travel (that would not ordinarily be there). Hence the word timing.
When a timing chain or belt breaks, the timing of the piston movements relative to opening and closing of valves at the top of the cylinders is no longer fixed. For most engines, this means the pistons will likely hit and bend valves that are in their path of travel (that would not ordinarily be there). Hence the word timing.
Get it taken care of immediately.
That i do understand.
I was also watching some videos on it last night.. or rather this morning. 3am probably isnt the best time to do that.. but i was'
From what i could find, i think the timing chain is on the left side of the engine. Im assuming its under the big metal hood that goes over the top of the engine. My next question is, can that hood be removed only to confirm the timing chain is the issue and then be put back on safely? Or is that best left to the shop? - If possible, naturally, id like to be able to say with certainty when i go to the shop. (I will NOT do a repair/replace on my own. Not a chance.) But if attempting that will risk screwing up something else, then i wont.
That bit of info^ i could not find online. Every example i found was with the engine exposed at the start. None of them showed the exposure/removal of hood.
Thats the engine. The plastic cover that goes over it I had already removed right before taking this video. (I was trying to capture the sound as best i could.) And of course was put back on afterwards.
Im guessing that that spot on the left is the where the timing chain is?
Yet another guess/assumption. Im assuming those would be the screws (some of them) that hold the top metal cover on. And would need to be unscrewed to be able to remove that metal hood and see the timing chain?
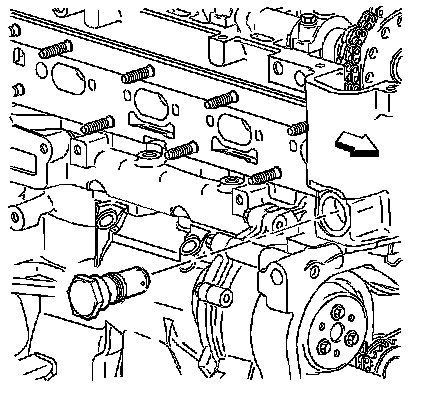
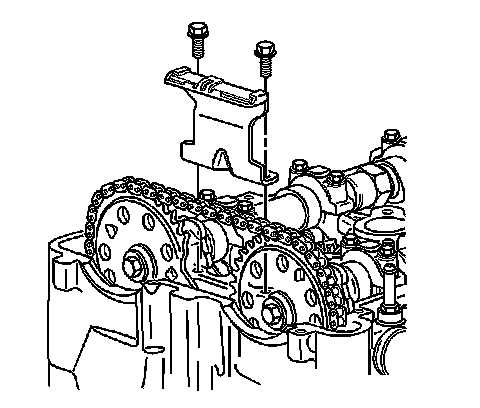
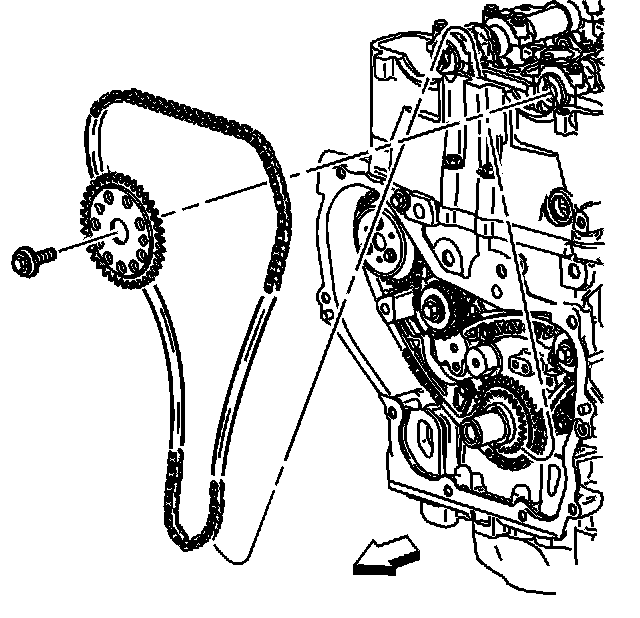
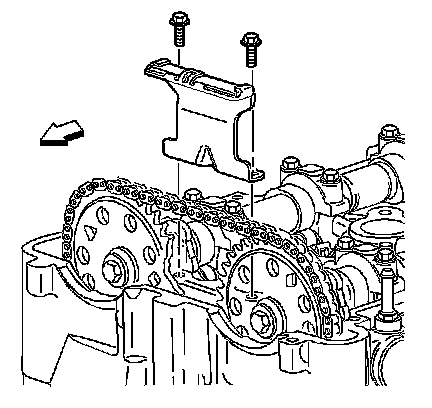
1. Remove the camshaft cover.
2. Raise and support the vehicle.
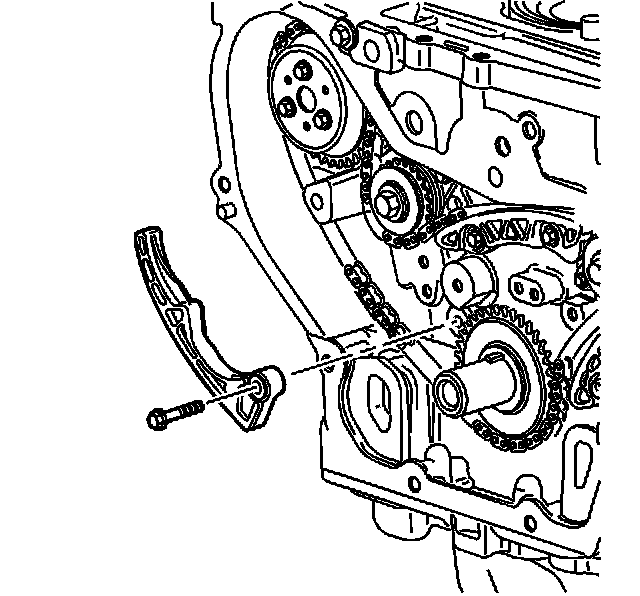
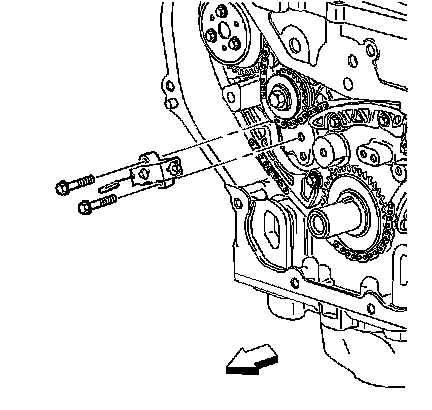
3. Remove the engine front cover.
4. Lower the vehicle.
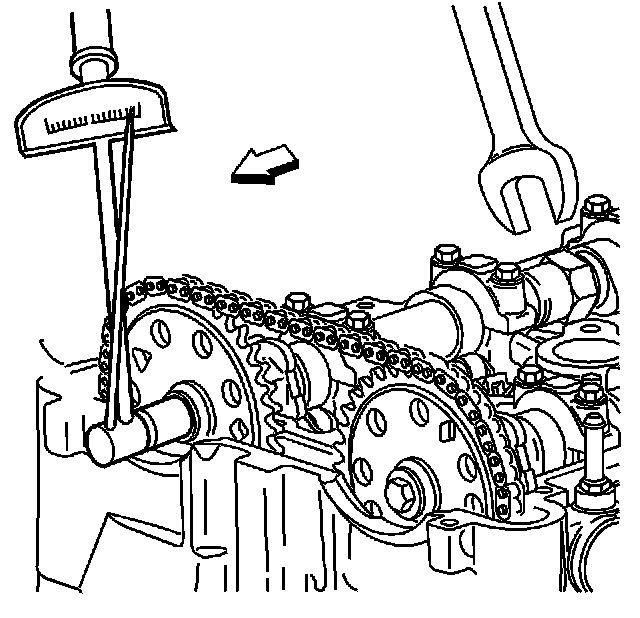
Important: To rotate the camshaft, use a 24 mm open-end wrench on the camshaft flats. Camshaft should be rotated in a clockwise direction only, facing camshaft sprockets from the passenger side of the vehicle.
5. Locate the No. 1 piston to approximately 60 degrees before top dead center (diamond shaped hole on intake camshaft sprocket at 12 o'clock position). Remove the spark plugs. This will ease the rotation effort.
6. Remove the timing chain tensioner.
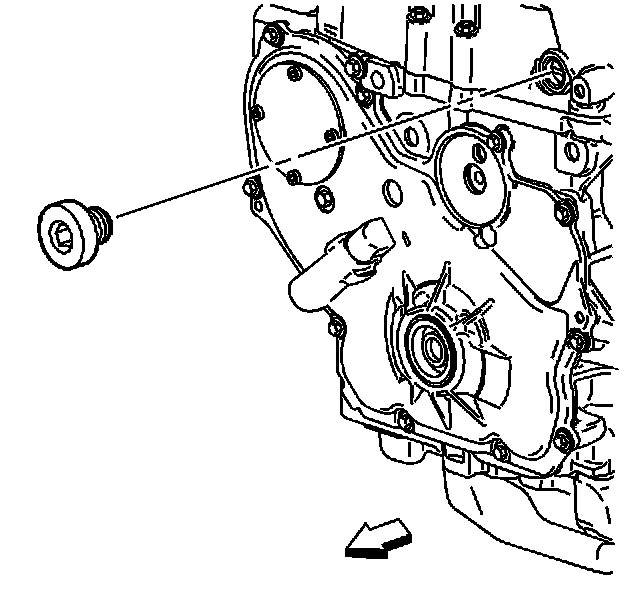
7. Remove the fixed timing chain guide access plug.
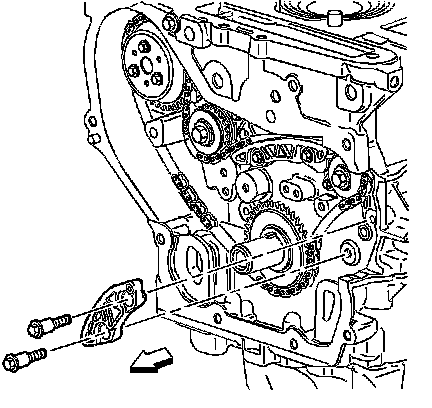
8. Remove the fixed timing chain guide.
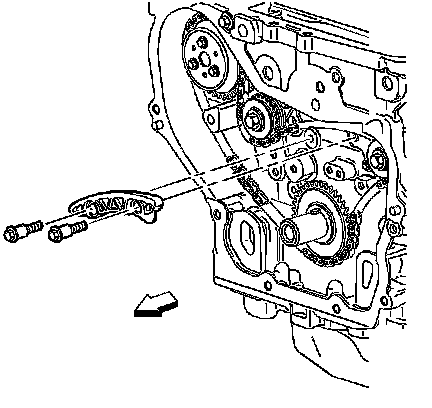
9. Remove the upper timing chain guide.
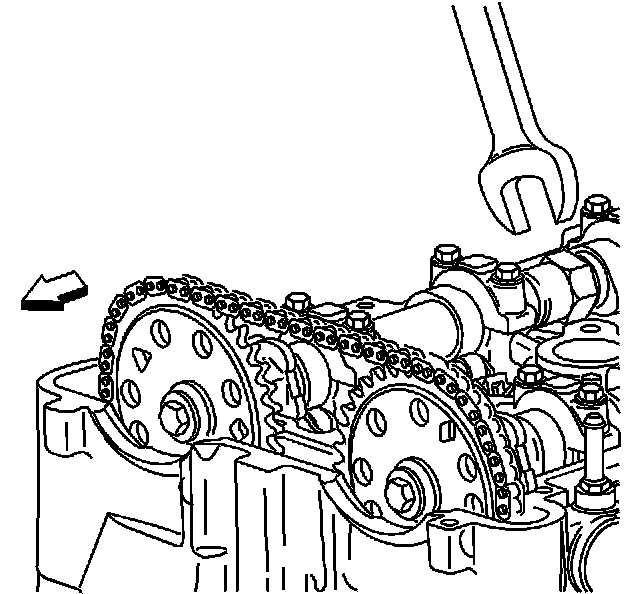
10. Use a 24 mm wrench to hold the camshafts from turning.
11. Remove the exhaust camshaft sprocket bolt and discard.
12. Remove the exhaust camshaft sprocket.
13. Remove the timing chain tensioner guide.
14. Remove the intake camshaft sprocket bolt and discard.
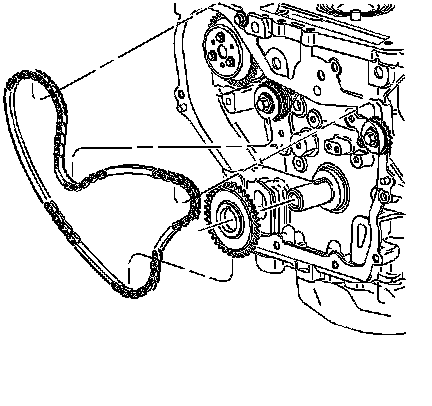
15. Remove the intake camshaft sprocket.
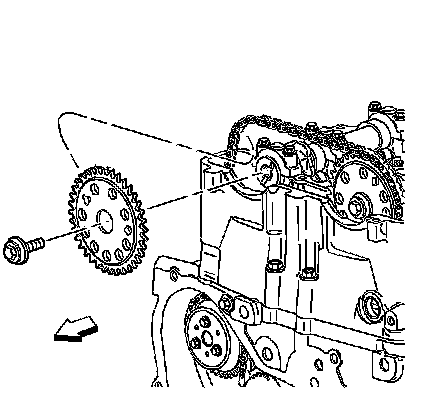
16. Remove the timing chain through the top of the cylinder head.
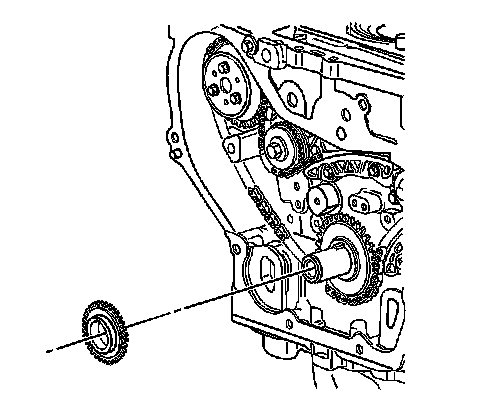
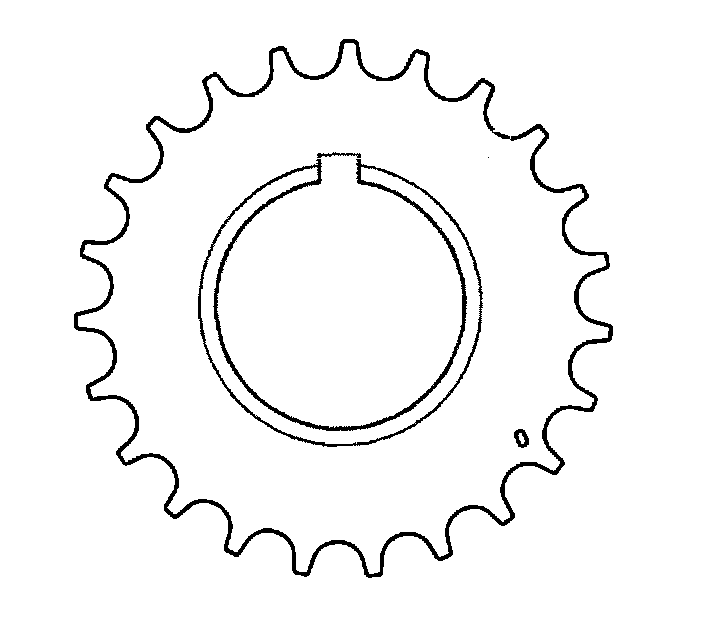
17. Remove the crankshaft sprocket.
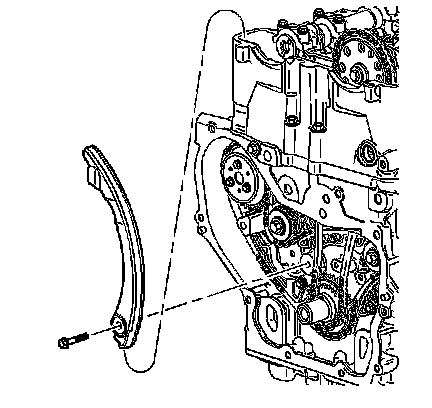
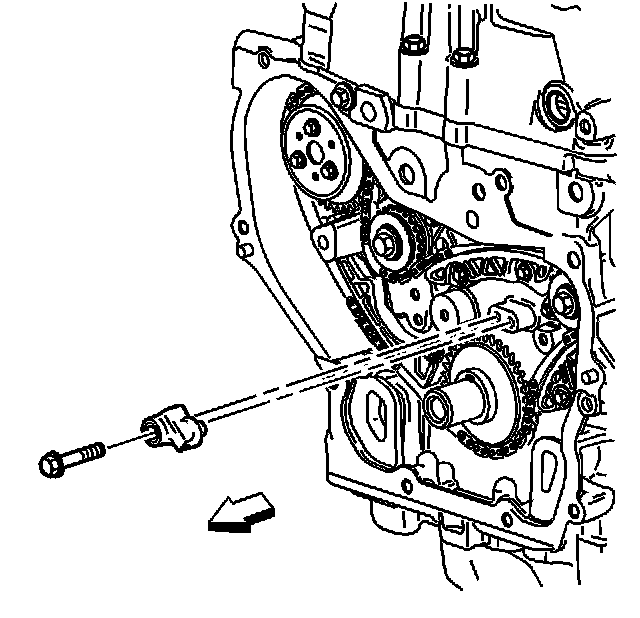
18. Remove the oil nozzle and bolt.
19. Remove the balance shaft drive chain tensioner.
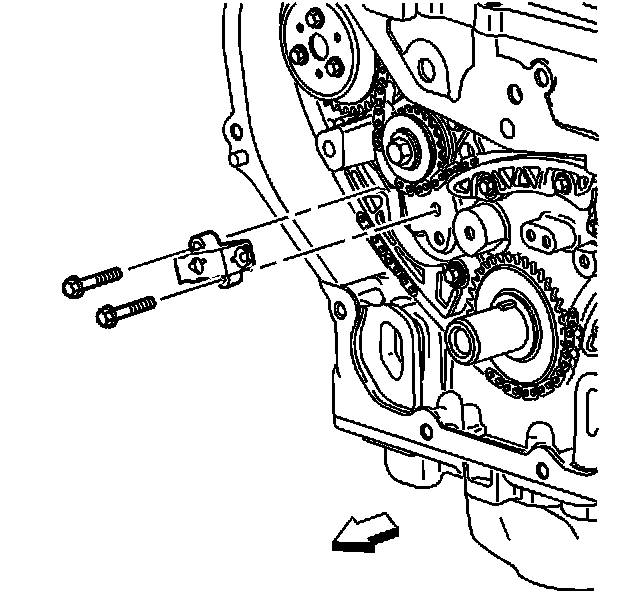
20. Remove the adjustable balance shaft chain guide.
21. Remove the small balance shaft drive chain guide.
22. Remove the upper balance shaft drive chain guide.
Important: It may ease removal of the balance shaft drive chain to get all of the slack in the chain between the crankshaft and water pump sprockets.
23. Remove the balance shaft drive chain.
Installation Procedure
Notice: Refer to Fastener Notice.
Important: If the balance shafts are not properly timed to the engine, the engine may vibrate and make noise.
1. Install the upper balance shaft chain guide.
Tighten the upper balance shaft chain guide bolts to 15 N.m (133 lb in).
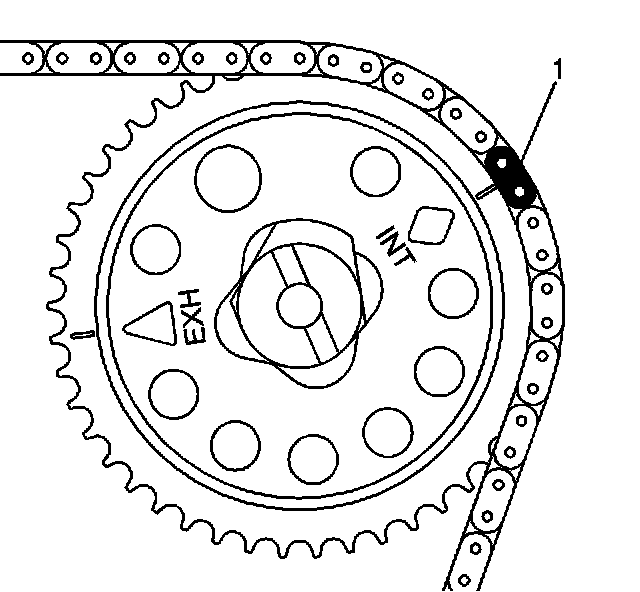
2. Install the balance shaft drive chain with the colored links lined up on with the marks on the balance shaft drive sprockets and the crankshaft sprocket. Use the following procedure to line up the links with the sprockets:
Orient the chain so that the copper colored and chrome links are visible.
1. Place the uniquely colored link (1) so that it lines up with the timing mark on the intake side balance shaft sprocket.
2. Working clockwise around the chain, place the first matching colored link (2) in line with the timing mark on the crankshaft drive sprocket. (approximately 6 o'clock position on the crank sprocket).
3. Place the chain (3) on the water pump drive sprocket (alignment is not critical).
4. Align the last matching colored link (4) with the timing mark on the exhaust side balance shaft drive sprocket.
3. Install the small balance shaft chain guide.
4. Tighten the balance shaft chain guide bolts.
Tighten the chain guide bolts to 10 N.m (89 lb in).
5. Install the adjustable balance shaft drive chain guide.
Tighten the chain guide bolts to 10 N.m (89 lb in).
6. Turn the tensioner plunger 90 degrees in its bore and compress the plunger until a paper clip can be inserted through the hole in the plunger body and into hole in the tensioner plunger.
7. Install the timing chain tensioner.
8. Tighten the chain tensioner bolts.
Tighten the chain tensioner bolts to 10 N.m (89 lb in).
9. Remove the paper clip from the balance shaft drive chain tensioner.
10. Install the oil nozzle and bolt.
Tighten the oil nozzle bolt to 10 N.m (89 lb in).
11. Install the crankshaft sprocket with timing mark at the 5 o'clock position.
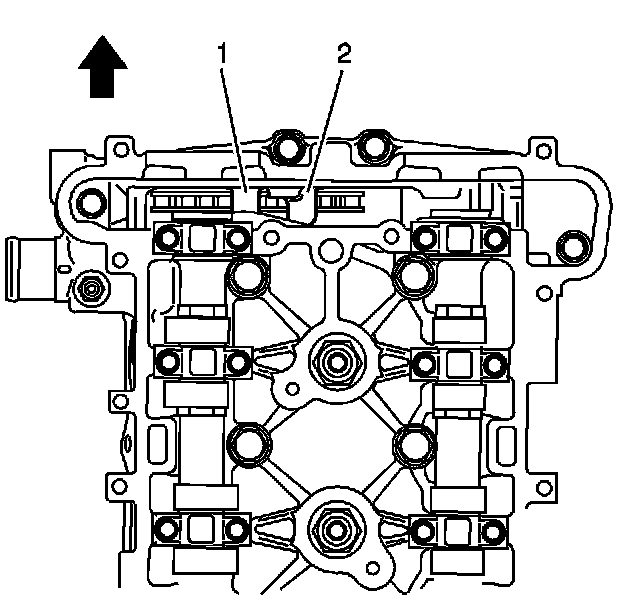
12. Lower the timing chain through the opening in the top of the cylinder head. Carefully ensure that the chain goes around both sides of the cylinder block bosses (1, 2).
13. Install the intake camshaft sprocket with the INT diamond at the 2 o'clock position.
Important: Always install NEW sprocket bolts.
14. Hand tighten a NEW intake camshaft sprocket bolt.
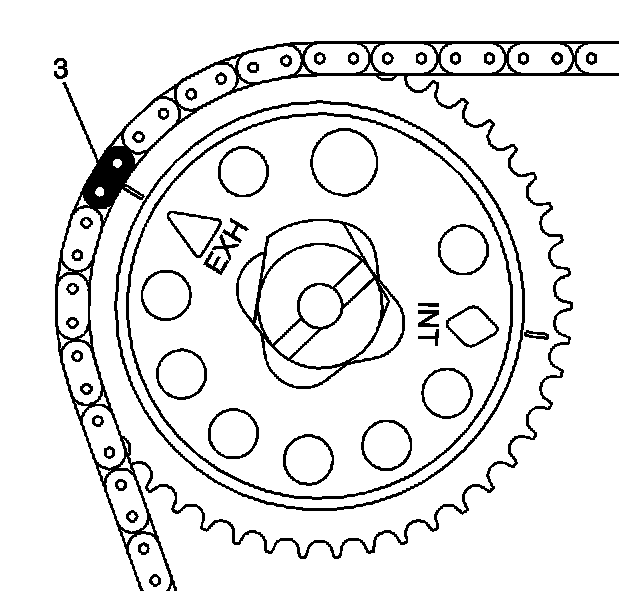
15. Route the timing chain around the crankshaft sprocket with the matching colored link aligning with the timing mark.
16. Route the timing chain around the intake camshaft sprocket with the uniquely colored link (1) aligning with the INT diamond.
17. Install the timing chain tensioner guide through the opening in the top of the cylinder head.
Tighten the timing chain tensioner guide bolt to 10 N.m (89 lb in).
18. Install the exhaust camshaft sprocket with the timing chain matching colored link (3) at EXH triangle aligned at the 10 o'clock position.
19. Use a 24 mm wrench to rotate the camshaft slightly, until exhaust sprocket aligns with the camshaft.
Important: Always install NEW sprocket bolts.
20. Hand tighten the NEW exhaust camshaft sprocket bolt.
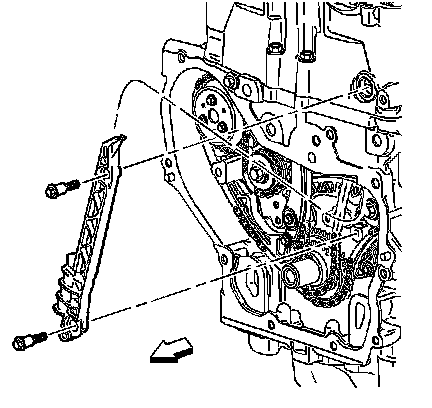
21. Install the fixed timing chain guide.
Tighten the fixed timing chain bolts to 15 N.m (133 lb in).
22. Apply sealant to the threads and install the timing chain guide bolt access hole plug.
Tighten the chain guide plug to 90 N.m (59 lb ft).
Tighten the timing chain upper guide bolts to 10 N.m (89 lb in).
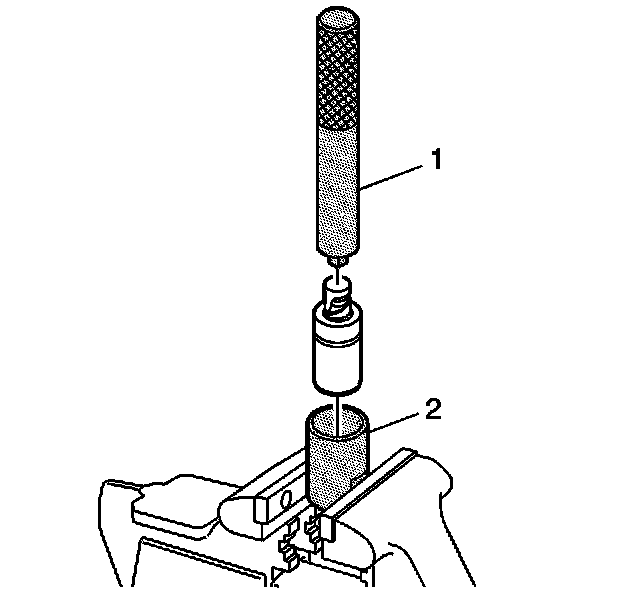
24. Inspect the timing chain tensioner. If the timing chain tensioner, O-ring seal, or washer is damaged, replace the timing chain tensioner.
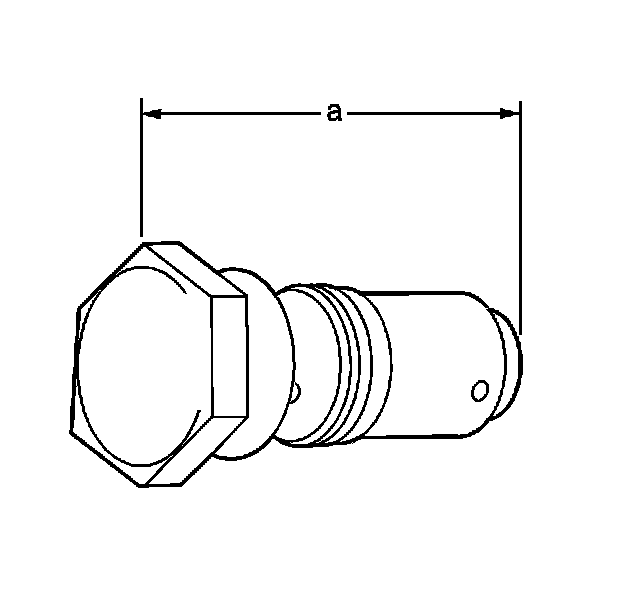
25. Measure the timing chain tensioner assembly from end to end.
A new tensioner should be supplied in the fully compressed non-active state. A tensioner in the compressed state will measure 72 mm (2.83 in) (a) from end to end. A tensioner in the active state will measure 85 mm (3.35 in) (a) from end to end.
26. If the timing chain tensioner is not in the compressed state, perform the following steps:
1. Remove the piston assembly from the body of the timing chain tensioner by pulling it out.
2. Install the J 45027-2 (2) into a vise.
3. Install the notch end of the piston assembly into the J 45027-2 (2).
4. Using the J 45027-1 (1), turn the ratchet cylinder into the piston.
27. Inspect the bore of the tensioner body for dirt, debris, and damage. If any damage appears, replace the tensioner. Clean dirt or debris out with a lint free cloth.
28. Install the compressed piston assembly back into the timing chain tensioner body until it stops at the bottom of the bore. Do not compress the piston assembly against the bottom of the bore. If the piston assembly is compressed against the bottom of the bore, it will activate the tensioner, which will then need to be reset again.
29. At this point the tensioner should measure approximately 72 mm (2.83 in) (a) from end to end. If the tensioner does not read 72 mm (2.83 in) (a) from end to end repeat steps 26.1 through 26.4.
30. Install the timing chain tensioner.
Tighten the timing chain tensioner to 75 N.m (55 lb ft).
31. Use a suitable tool with a rubber tip on the end. Feed the tool down through the camshaft drive chain to rest on the timing chain. Then give a sharp jolt diagonally downwards to release the tensioner.
Thank you for that. Im going to go out on a limb and say thats probably not something i should be screwing around with...
Since i wont be able to take a physical look at it, it does raise another question tho. I was searching for timing chains, most of which came up as timing chain kits. But i was surprised at the many variations that showed up being listed as compatible with my car. Some of them seem so very different that its hard to imagine all are actually compatible. I understand that they have different amounts of pieces in each kit. But the pieces look so very different that it doesnt seem like its the same thing (for the same car/engine.) So how does one determine the correct part / timing chain for my car? Also, considering its all kits and parts, are there other parts that 'should' be replaced along with the single chain itself?
If you are not comfortable doing the replacement of the timing chain, not sure it's a good idea for you to pull the valve cover, the top portion of which uncovers the cam timing sprockets on which the chain runs among other things. That top cap or whatever you put the rectangle around is part of the valve cover. Removing that will allow you to look down across the front of the engine (timing stuff on this engine is on the front. The engine is mounted transversely, so the front of the engine is actually pointing towards the side of the car. When viewed from in front of the car, the front of the engine points to the left.
Anyway, I believe Andy was referencing guides that keep the timing chain riding where it should. They're often made out of plastic, so if they wear down or completely away, then you have the chain dragging along the metal behind the guide, thus making a metal on metal high pitch noise. This can be visually confirmed by removing the valve cover and looking down the front of the engine.
There's no telling when or if that chain is weak enough to break. Simply ask your mechanic to show you what's going on when they write up the estimate. You will know for sure it is the correct diagnosis and you will also learn something so it's a double win. But this is an urgent matter. The chain could snap on any rotation of the engine, one or 3692 or 5,421 from now. Get it towed to your mechanic and fixed.
so we cant say to much without getting a look at the chain itself. - Side question, if the metal valve cover has to come off to get a look (and eventually repair/replace) the timing chain, should anything else be looked at or replaced while its apart? It might be the first time its ever been taken off since it was first placed on there.
Also, is the top valve cover and bottom cover just metal on metal seal with bolts or does it have a gasket? If it does, should that be replaced given its likely 18 years old?
If someones going in there, mine as well look at any potential issue or items that should be replaced now and then, while the thing is open. I just havnt a clue what any of those could be'
--
Originally Posted by derf
If you are not comfortable doing the replacement of the timing chain, not sure it's a good idea for you to pull the valve cover, the top portion of which uncovers the cam timing sprockets on which the chain runs among other things.
After watching some videos and looking as diagrams some, i think i could probably remove the valve cover without issue. But if i screw something up in the process that i wasnt expecting.. then id likely be screwed. But i guess thats usually always the case'
Not that its really comparable, but i managed to take apart the riding mowers engine some to replace the head gasket. And did it without screwing anything up. More involved then id have thought. But not $400 worth of involved which was what the shop wanted.