19bonestock88’s 2004 ION-2 sedan “Green Line” BUILD


#22
 09-23-2018, 09:52 AM

So, guys, my car is gonna be garaged for a while... wife’s car was recently pulled into service and currently I can only afford to insure one at a time... the build will continue, as there are lots of mods that can be developed without the car being legal to drive...
what I wanna try and get done:
1. Recaro seat swap from RL(and clean up interior)
2. Wheel skirts, first will make them for rear wheels then will develop front wheel skirts(will have to articulate with wheel turning)
3. Possibly swap on front clip from RL(it looks nice and *may* be more aerodynamic
4. Header and exhaust?
5. Get rid of power steering error message
6. Build rear diffuser/belly pan
all of this in no particular order, depending on how long the car will be down...
#23
09-24-2018, 08:10 AM
I now have mounting tabs for the rear wheel skirts, just need to cut out the coroplast to actually make them, and make a stiffener for the bottom edge of the skirt, otherwise it’ll flap and as a result rub the tire... pics to come soon I hope
#24
09-26-2018, 01:32 AM
For some reason I can’t focus on just one project at a time, so I also have the rear seats loose in preparation for a good detailing and the Recaro swap...
#25
10-09-2018, 12:44 AM
So my cars been cleaned out and vacuumed good and the Recaro seats swapped in...
a detwrmined person could complete the swap in like 20 min with an air ratchet to loosen the seat bolts... two bolts on each front seat (15mm head) and the back seats clip in...
now, both my carpet and the seats are fairly stained so it’ll come apart again for stain removal or fabric dye-ing but for now it’s teallg comfortable...
i will warn that while while swapping the coupe/RL rear seats does work it reduces rear passenger capacity to just two... you could probably grab a black leather bench from another sedan if you want them to match but need the seating capacity...
#26
10-26-2018, 03:13 AM
Been working on my car again, revised my planned wheel skirt mounting, so I have to make some more brackets, but it should reduce the push rivets used to two per side, making it easier to remove the skirts for wheel removal... I also have the coroplast cut out and the stiffeners screwed to them... they still need bent to precisely the right shape to clear the tire but I’m getting closer...
Last edited by 19bonestock88; 11-03-2018 at 11:06 AM.
#27
11-03-2018, 11:09 AM
Wheel skirt panels are done and brackets are attached to the car... need some push rivets to finish the install, then I can move on to the next project...
i really need to test the car with a good battery to see if it’ll start, all the mods in the world won’t make it run if something is wrong, further than just a bad battery
i really need to test the car with a good battery to see if it’ll start, all the mods in the world won’t make it run if something is wrong, further than just a bad battery
Last edited by 19bonestock88; 11-11-2018 at 11:16 PM. Reason: tried again to add images, I guess the forum discriminated against iOS users?
#28
11-17-2018, 10:24 AM
I revised my trunklid extension again, making it just a little longer and adding side panels to hold the ends up and to form a box cavity on the end of the trunk... this version is also the first that isn’t attached primarily with strapping tape, I used hot glue at the seams and screws to hold it to the car...
Last edited by 19bonestock88; 11-19-2018 at 02:07 PM.
#29
11-18-2018, 05:28 PM
I finished my new airbox lid today, trimming the outlet to an appropriate length and cleaning up all the seams... I also removed all the plastic fins on the inside to incrementally increase the plenum volume (likely only 20-30cc) and marginally increase throttle response... with it all cleaned up it *almost* appears as a stock part, though you can see the seam where I changed the outlet...
#30
12-23-2018, 09:55 PM
Ive been slacking, guys... I’ve had my car back on the road for a couple weeks, but haven’t posted any pics of it since it has been running... since the forum software won’t let me upload pics, but Photobucket started working again, I just uploaded my newest pic there...
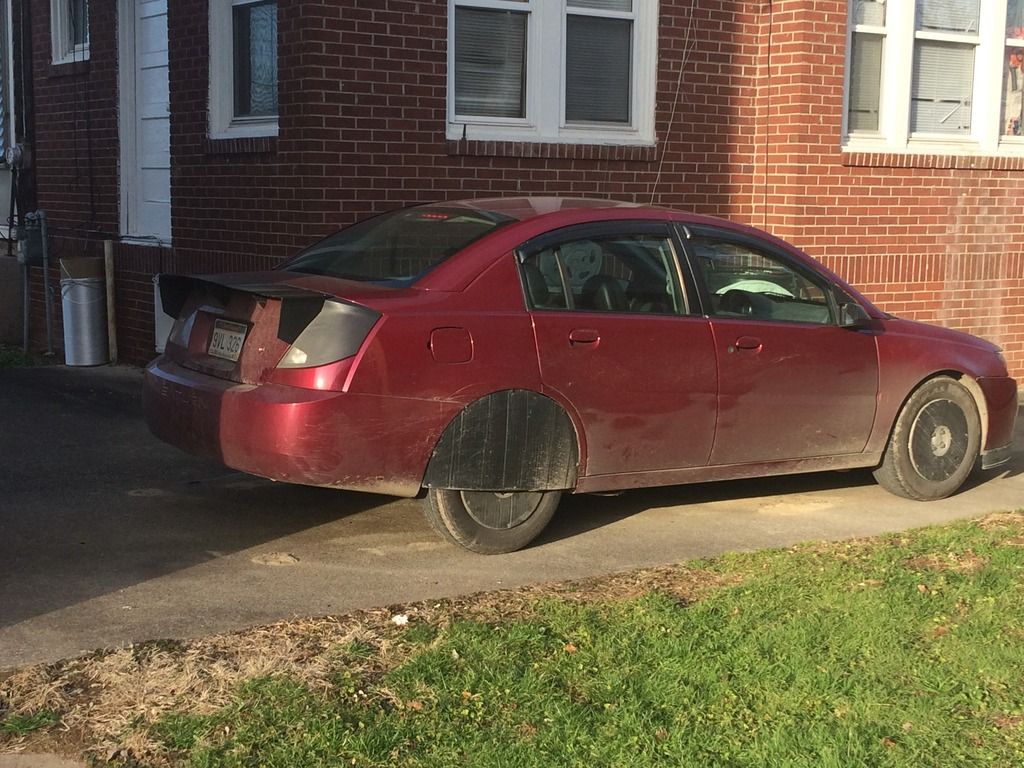
it shows off my recent aero work decently...
opinions?
it shows off my recent aero work decently...
opinions?